

[ad_1]
It’s early days for Counter-Strike 2, and lots of gamers are in search of a aggressive edge on the server as they rise via the ranks. Proper now, it’s protected to say the sport isn’t fairly as optimized as CS:GO was. That’s why we’ve put collectively this information to the most effective CS2 NVIDIA settings, so you’ll be able to make sure you’re enjoying on the most FPS doable.
Whereas the most effective CS2 settings might change as the sport turns into extra optimized, for now, that is all you want.
Greatest CS2 Settings
Credit score: Daniel Morris
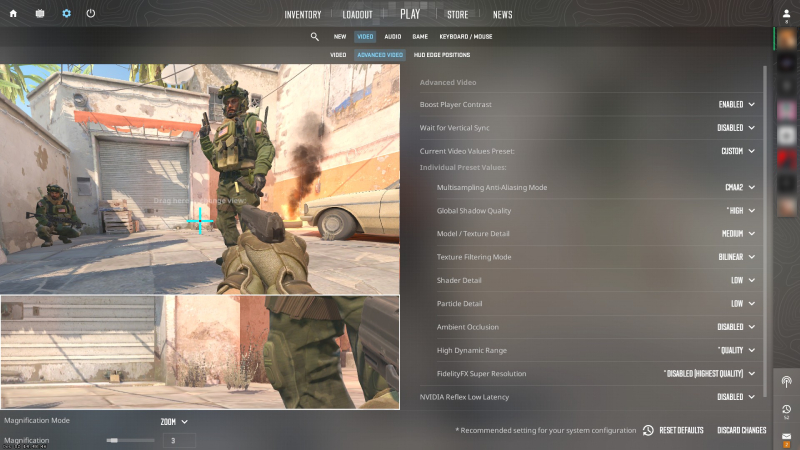
First issues first, it is best to begin in-game. Press the cog within the high left nook of your Counter-Strike 2 Shopper, and head to the “Video” tab. From there, go to “Superior Video” and choose the next settings. If you happen to’re a CS2 NVIDIA consumer, these will present the most effective outcomes for FPS and visibility in-game:
- Enhance Participant Distinction: Enabled
- Look ahead to Vertical Sync: Disabled
- Multisampling Anti-Aliasing Mode: CMAA2
- International Shadow High quality: Excessive
- Mannequin / Texture Element: Medium
- Texture Filtering Mode: Bilinear
- Shader Element: Low
- Particle Element: Low
- Ambient Occlusion: Disabled
- Excessive Dynamic Vary: High quality
- FidelityFX Tremendous Decision: Disabled (Highest High quality)
- NVIDIA Reflex Low Latency: Disabled
By selecting the right CS2 settings inside the sport, you’re setting your self up for achievement when leaping into the Counter-Strike 2 release.
CS2 NVIDIA Management Panel Settings
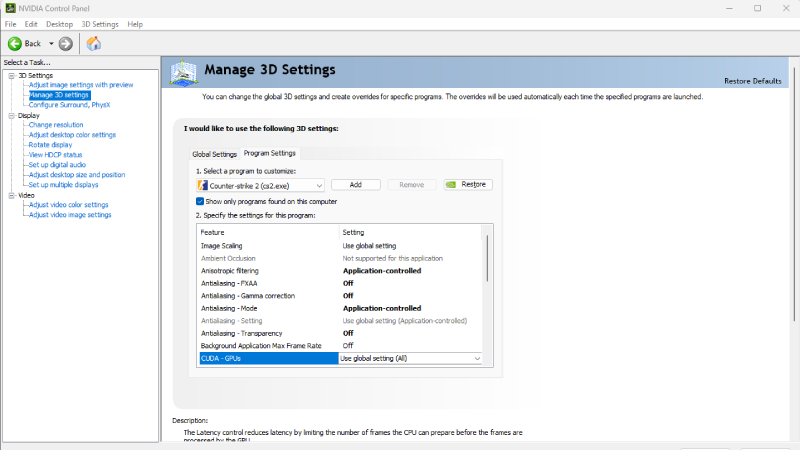
Credit score: Daniel Morris
Nevertheless, it’s not the one means CS2 NVIDIA customers can enhance their efficiency. The NVIDIA Management Panel is a great tool you need to use to regulate issues even additional. You are able to do this by opening NVIDIA Management Panel, urgent “Handle 3D settings,” and going to “Program Settings”. From there, hit the drop-down menu and discover your CS2.exe (you might have to manually seek for this). After this, choose the next settings:
- Picture Scaling: Use world setting
- Anisotropic Filtering: Utility-controlled
- Antialiasing – FXAA: Off
- Antialiasing – Gamma Correction: Off
- Antialiasing – Mode: Utility-controlled
- Antialiasing – Transparency: Off
- Background Utility Max Body Price: Off
- CUDA – GPUs: Use International Setting (All)
- Low Latency Mode: Off
- Max Body Price: Off
- Multi-Body Sampled AA (MFAA): Off
- Texture Filtering – Anisotropic Pattern Optimization: Off
- Texture Filtering – Damaging LOD Bias: Off
- Texture Filtering – High quality: Excessive Efficiency
- Texture Filtering – Trilinear Optimization: On
- Threaded Optimization: Auto
- Triple Buffering: Off
- Vertical Sync: Off
- Digital Actuality Pre-rendered Frames: 1
There are different settings right here too, however you shouldn’t want to the touch them. When you’ve accomplished this, you’re all set and able to go as a CS2 NVIDIA consumer!
[ad_2]
Source link


